Page 1
In order to be able to make standard USB HID devices (like game controllers, keypads, mice, digitizers) that can talk directly to the operating system, you need to be able to pack odd sized pieces of data together in the way that the PC expects them, like the illustration below: an example that comes directly from the HID Usage Table Specification.
Devices that can pack and unpack like that can talk directly to any operating system: not just Windows, but Apple and Linux, too!
(It's true that HIDmaker FS makes user mode programs "only" for Windows right now, but for devices that talk directly to the operating system anyway, that's not a problem: you can develop your device in a Windows environment, and use your device with Linux or Mac O/S or any other operating system that can talk directly to a HID device.)
Click on the image for page view.
Page 2
Even if you plan to have your device talk only to a PC program of your own, you will still want to send bit variables at times, or bit fields: groups of data items having one bit, with maybe some items being 2-7 bits in size, because that is all the space they need. (Why waste packet space?)
Page 3
Packing and unpacking your data to or from multiple USB packets is not just a convenience: it is fundamental.
It is like the engine that makes your car go. It is the essential power plant that enables you to actually get all of the power that your USB device is capable of providing.
You wouldn't drive your car with only one cylinder working, would you? Of course not. You want to use all the power that your car has.
So why should you limit your USB device to only one packet of generic byte data if you don't have to? Why wouldn't you want to use all the power that your USB device has, especially since HIDmaker FS makes it so easy?
Click on the image for page view.
Page 4
It's hard to do packing and unpacking of odd sized data items in a microcontroller, always get it right, and still do it fast enough. But that's just what HIDmaker FS does for you, on both the peripheral side and the PC side of the USB cable.
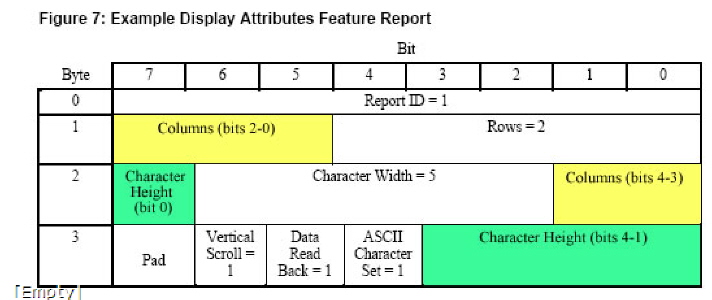
Let's take a closer look at that example again, to see what we mean. This shows a small (4 byte long) Feature Report for a device that has a 2 line x 16 character LCD display.
Note that this is a bidirectional Feature Report, which can be sent IN from the peripheral device to the PC, or OUT from the PC to the device. That means that both the PC software and the peripheral firmware must be able to both pack and unpack this Feature Report.
Click on the image for page view.
Page 5
It's clear that the sizes of most of the data items in this Report are smaller than 8 bits: some are 5 bits long, others are only 1 bit long. We have colored some of the cells in the following table to emphasize that some of the data items, "Columns" and "Character Height" spill over into the next byte of the packet.
Notice that some of the data items (like "Rows") touch one end of a byte boundary, others (like "CharacterWidth") lie somewhere in the middle of a byte, and some other data items (like "Columns" and "CharacterHeight") lie partly in one byte, and partly in the next byte!
Click on the image for page view.
Page 6
Clearly, packing and unpacking stuff like this yourself will take some work!
In the picture below, we have shown you what the layout of data items in the packet must be for this specific example. However, for some other project, it would be completely different.
If you were making a HID device without the help of HIDmaker, you would first have to figure out that layout for yourself.
Click on the image for page view.
Page 7
Perhaps you have tried doing this yourself.
Maybe you started with that data layout, and then had to write one of those complicated Report Descriptors to match your intended data layout. Or maybe had to figure it out the other way: you were given a Report Descriptor, and had to figure out what the data layout is. Either way, we sure hope you got it right! :-)
Then, on BOTH the PC and the peripheral side, you then have to write code that can pack data into packets with this layout, AND unpack data from such packets as well. Each byte of the packet contains different stuff, so it is sure to be a lot of work.
Now packing and unpacking something like this example (which is only a few bytes long) is something you might tackle yourself. But what if your Report was much larger, requiring you to write code to pack and unpack hundreds of bytes like this, in multiple packets?
Page 8
Another thing you will need to be able to handle is data items that are larger than 8 bits, like the 16-bit and 32-bit data sizes that are common in most programming languages these days. You certainly will want to be able to send and receive those without hassles too, right?
The data layout below shows a situation where a 16-bit data item and a 32-bit data item are mixed in with some smaller data items. For simplicity, we have given each of the data items a name that tells its size in bits: Data16 is a 16 bit data item, and so on. We have colored the items Data16 and Data32 to make their positions in the packet easier to see.
Bit
| Byte |
7 |
6 |
5 |
4 |
3 |
2 |
1 |
0 |
| 0 |
Data16 |
Data3 |
| 1 |
Data16 |
| 2 |
Data16 |
| 3 |
Data32 |
Data2 |
Data16 |
| 4 |
Data32 |
| 5 |
Data32 |
| 6 |
Data32 |
| 7 |
Pad |
Data32 |
Page 9
Oh, one more thing: we forgot to mention packet boundaries.
If your Report is larger than one packet, here is another type of situation you will need to be able to handle: a data item that crosses the boundary between one packet and the next. In the example below, a 32-bit data item called Data32 (shaded green for clarity) starts in byte 63 of a 64-byte packet, and has to extend into the following packet of the Report.
bit
| byte |
7 |
6 |
5 |
4 |
3 |
2 |
1 |
0 |
| 58 |
whatever... |
| 59 |
whatever... |
| 60 |
whatever... |
| 61 |
whatever... |
| 62 |
whatever... |
| 63 |
Data32 |
Data3 |
| 64 |
Data32 |
bit
| byte |
7 |
6 |
5 |
4 |
3 |
2 |
1 |
0 |
| 1 |
Data32 |
| 2 |
Data32 |
| 3 |
|
|
|
|
|
Data32 |
| etc. |
whatever... |
| etc. |
whatever... |
| etc. |
whatever... |
| etc. |
whatever... |
This is a common situation that a real HID device must be able to handle. Part of the Data32 item appears in one packet, and the rest of the Data32 item isn't even present until the next USB packet arrives.
Page 10
HIDmaker FS's Packing and Unpacking Engine does all that stuff for you, completely automatically, at high speed, and always gets it right. All you need to do is to declare the data items that you want, their sizes and direction (i.e., Input, Output, or bidirectional Feature report items), and HIDmaker FS generates code that packs and unpacks the data at each end.
As we show in a later tutorial in this series, the custom code that HIDmaker FS generates for you declares convenient variables with the same names as the ones you defined with the Visual Data Designer. In the code that is generated for the Peripheral, HIDmaker FS will create variables of the most convenient size. For example, if you declare a USB data item whose size is anywhere from 2 to 8 bits, then HIDmaker FS will generate an 8 bit data item for you. A data item whose size ranges from 9 to 16 bits will produce a 16 bit variable, and so on.
All you need to do, in the code you add, is to just use those variables.
Page 11
Here's all you do in the peripheral device code:
- For data items that go IN to the PC, we provide commented sections in the code where you should put values into those variables, just before the data gets sent to the PC, like this example in C:
- For data items that go OUT from the PC, we provide commented places in the code where an Output Report has just arrived, so you can simply do whatever you want to do with the data that just got here.
- If your device uses bidirectional Feature items, your custom generated peripheral code also has specially marked places for you to either handle new values sent OUT from the PC, or where you can update the values of Feature items before you send them IN to the PC.
As we'll show in the HIDmaker FS walkthrough, there are similar places in the custom generated PC code as well where you can either put values into variables before sending data OUT to the peripheral, or where you can make use of data that has just come IN from the peripheral device.
Page 12
There's a reason why we refer to HIDmaker FS's "Packing and Unpacking Engine." Like the locomotive of a railroad train, it provides the power that makes things go.
Click on the image for page view.
Page 13
Like a railroad locomotive, HIDmaker FS's engine has the power to pull many "cars" (packets). But our engine even provides the power to automatically load and unload all the freight cars, too.
Click on the image for page view.
Page 14
By comparison, those free example programs you find on the web are like a railroad hand car, which has to be powered by you.

So if you want your USB project to have the power it needs, you need the right engine: HIDmaker FS!
|