Page 1
There are three main parts in the Visual Page Designer process:
- Defining Your Variables,
- Laying Out Your Pages, and
- Saving and Testing Your Pages
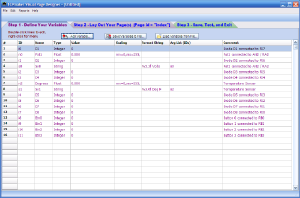
You can switch back and forth between these three pages as you need to. You can click on the Define Your Variables page, to define data items that will be sent between the PC's browser and your TCPmaker device, as you see here.
Click on the image for page view.
Page 2
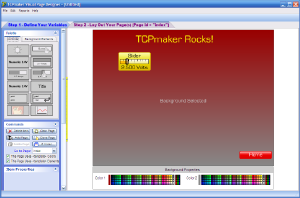
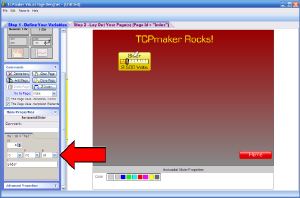
You can also click on the Lay Out Your Page(s) tab to create the pages of content that your users will see.
Click on the background of your page, and use the two color pickers below the active area (the "stage") to set the background colors for your page. As you can see, the backround is a linear gradient, in which the color gradually changes from Color1 at the top, to Color2 at the bottom of the page.
Then, you can place interactive controls on your page which display and / or send those variables, as you see here .
Let's go back to the Variables page to explain how variables are created and used.
Click on the image for page view.
Page 3
Variables are named data containers. They carry data between the PC browser and your device, and which are used in your generated code. There are three data types: Integer, Numeric (i.e., floating point), and String.
Integer variables send integer data, which is the type that small microcontrollers work with most easily.
Click on the image for page view.
Page 4
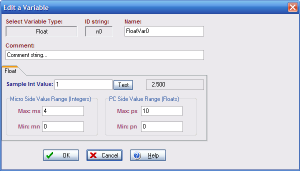
A Numeric variable, being edited in this dialog box, expects to transmit the data to or from the micro in integer form, but to display it on the PC browser in floating point form.
The parameters mx and mn are the maximum and minimum values that this Numeric variable is expected to have on the micro side.
The parameters px and pn are the maximum and minimum of the range of corresponding values that will be displayed on the PC browser.
The Sample Int Value allows you to test this relationship in your design. In this example, a value of 1 is 1/4 of the way between the min and max values (mn=0 and mx=4) that the micro will send to the PC. One quarter of the way between the min and max displayed value range (pn=0 and px=10) is 2.500, which is the value that will be displayed on any controls on page layouts that use this Numeric variable.
Click on the image for page view.
Page 5
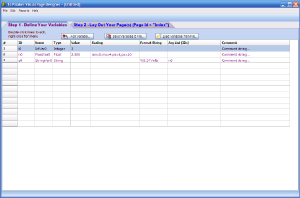
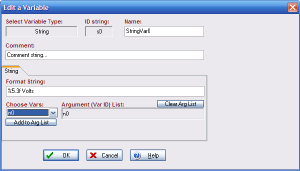
A String variable can optionally contain format strings to display data.
In this case, we have a format string, "%5.3F Volts", and an Argument List showing that a Numeric variable whose Id is "n0" will have its value displayed, using this format, in any control on our layout that uses this particular String variable.
This format string can be changed dynamically from the PIC, giving TCPmaker devices very powerful display capabilities.
Click on the image for page view.
Page 6
Here we see a Horizontal Slider control that uses the String variable s0 that we showed on the previous slide. Rememer that s0 is in turn applying its formatting string to display Numeric variable n0's current value 1 (out of 4 on the micro side), as scaled to the PC side range (0..10).
This scaling and displaying process happens automatically in the PC browser. In this case, the Horizontal Slider is a control for sending numbers to the micro device. The PC browser will scale the value to the nearest integer in the micro side range (mn..mx) In this case it will send an integer value "1" to the event handler for this Numeric variable in the PIC code. You just need to add a small amount of code to this event handler to do something with this value when the event handler receives it.
Click on the image for page view.
Page 7
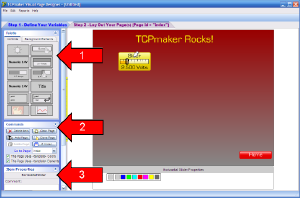
TCPmaker's Visual Page Designer contains a palette of powerful interactive controls that can change or display data: gauges, sliders, buttons, lights, text indicators, and even displays for dynamic graphs and static and animated images. There is also a full palette of graphic elements for constructing attractive backgrounds that go behind your controls.
Powerful commands for adding, clearing, and cloning pages are available, as is the ability to apply a master template to give all of your pages a consistent, attractive look.
When you click on a control on your page to select it, you can see and edit the control's properties. There is also an Advanced Property page that allows you to rotate and scale the size of your control, and even make it partially transparent.
Click on the image for page view.
Page 8
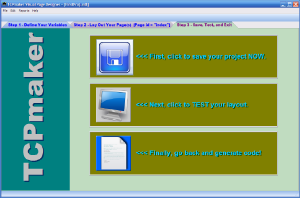
When you're satisfied with your content pages, click on the tab marked "Step 3 - Save, Test, and Exit".
Click the topmost button to save your layout and generate the run.xml file that will be stored on your device.
Click the second button to actually test your layout in a browser before you generate code for your embedded web device's microcontroller. You'll be able to see your layout in full detail, as shown on the next page.
Click on the image for page view.
Page 9
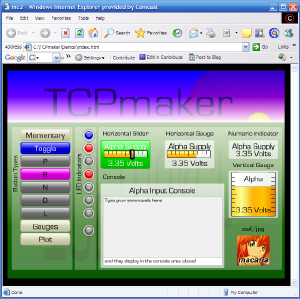
Even though your device will not be connected and running, you'll still be able to interact with some of the Controls, like Pushbuttons, Sliders, and Input Text controls.
You can use the Visual Page Designer's powerful capabilities to create attractive pages that your device can display on any browser. You can test your layout at any time, in the browser right on your local PC, and then go back to the Visual Page Designer for further adjustment as necessary.
One interesting note: the static screen shot you are viewing now is actually much larger in size than the real interactive library that we store on the micro!
Click on the image for page view.
|