Page 1
Now it is time to customize your project, to add some simple "real I/O" code that will bring your project to life.
In this tutorial, we'll explore the code that TCPmaker generates for your project, how it works, and how to add your own program code to it.
However, before we get into the details of TCPmaker's generated code framework, let's step back a bit and review how your TCPmaker project works.
Page 2
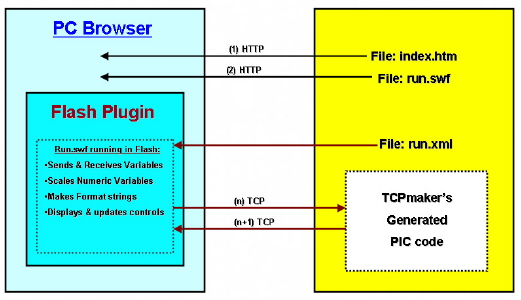
To understand how your TCPmaker project works, let's look at the diagram below that shows what gets sent in each direction.
When your PC browser is pointed at your device, it asks for a file called index.htm, just as a browser usually asks from most any web site. Your device sends this file to the browser.
In our case, index.htm refers to something that the PC browser thinks is a picture to display: run.swf, a small Adobe Flash object. The browser gets this file from your device as well, and when it receives run.swf, the browser loads the Flash plugin to display the "picture." (All new PCs for the past several years have this Flash plugin already installed, and 95% of all PCs in the world already have this plugin available.)
The Flash plugin executes run.swf, which is actually a special object oriented library, that communicates with your device. This library reads a third file from your device, called run.xml, which tells the plugin how to create and draw the TCPmaker controls on the browser screen.
Then, the run.swf code in the Flash plugin sends commands to your device, and processes any responses it gets, sending compact messages back and forth about 12 times per second.
Click on the image for page view.
Page 3
As the PC browser sends messages to your device, these messages are processed by the custom code that TCPmaker has generated for your project.
This custom generated source code is organized into a framework that is easy to understand and customize, making use of events and event handlers.
Simply stated, an event handler is a little routine that gets called when something important happens, such as the arrival at the device of a new value of a particular Variable.
Page 4
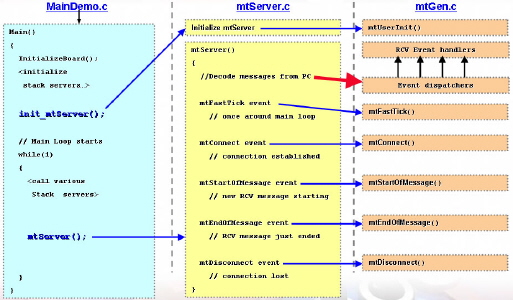
TCPmaker just adds a few important files on top of the very capable Microchip TCP-IP Stack, as shown in the diagram below.
The column on the left shows how we have added a bit to the main module of the application: Microchip's file MainDemo.c. The main() function in this module normally contains some initialization code that starts things up in your board as well in various parts of the Microchip Stack. We have added a line that initializes our "message pump," called mtServer.c, shown in the middle column.
After the main() function initializes things, it enters an infinite loop that periodically calls various servers in the Stack. We have added a line to that infinite loop, that calls our mtServer() message pump regularly.
Click on the image for page view.
Page 5
Each time the mtServer() routine is called, it looks for a message from the PC on a particular port. When it receives one, it decodes it and then calls various routines in another file called mtGen.c.
Which specific routine gets called depends on what the message contained. The specific type of message is called an event, and the corresponding routine that is called is the event handler.
The most common events in TCPmaker occur when a new value of a particular Variable is received from the PC browser. TCPmaker generates a different Receive Event handler, in file mtGen.c, for every Variable you created that can send data from the PC.
File mtGen.c will be the file that you will concentrate on the most. It is custom generated by TCPmaker for your specific project, and contains all the event handlers that you need to customize in order to bring your project to life.
Click on the image for page view.
Page 6
This particular project happens to be set up to work with a PICDEM.net2 board, which has 8 LEDs, 4 switches, a pot, a temperature sensor, and an LCD display. So, we have declared the following TCPmaker Variables in this project, which are summarized in a comment header in file mtGen.c:
//*****************************************************************************
//
// Variable Declarations:
// ======================
// The following variables were created in TCPmaker's Visual Page Designer, for
// the purpose of transferring specific, named data items between the device
// and the PC browser:
//
// Integer Variables:
// ==================
// D1 (id="i0")
// D2 (id="i1")
// D3 (id="i2")
// D4 (id="i3")
// D5 (id="i4")
// D6 (id="i5")
// D7 (id="i6")
// D8 (id="i7")
// Btn0 (id="i8")
// Btn1 (id="i9")
// Btn2 (id="i10")
// Btn3 (id="i11")
//
// Numeric Variables:
// ==================
// Pot1 (id="n0")
// Degrees (id="n2")
//
// String Variables:
// =================
// Sv0 (id="s0")
// Sv1 (id="s1")
//
// Communication Controls:
// =======================
// It1 (id="it1")
//
// Variables that travel either into or out of the device are declared
// here.
//
//*****************************************************************************
Page 7
Let's focus on one particular TCPmaker Variable, D1, which is intended to carry a value from the PC to the PICDEM.net2 board, in order to turn a particular LED on or off.
Here is the declaration of D1 in file mtGen.c:
// Variable D1 - Diode D1 connected to RJ7
// Used by these controls in browser layout:
// D1 Class=Iv Id=i0 **In** **Out**
// Pb1 Class=Pb Id=pb1 --- Page: name=Index Class=Pg Id=index
//
//
int D1; // Data transfer variable as created in Visual Page Designer
unsigned char D1TxFlag; // Transmit flag for this variable: set True to send
TCPmaker has declared a variable named D1 in your C code for the PIC microcontroller: this is a variable of the same name that you created in TCPmaker's Visual Page Designer. TCPmaker has also declared a corresponding flag called D1TxFlag that you can use if you want to send this D1 variable back to the PC for any reason.
The comment header above the variable gives us information to remind us of the intended use of this variable.
The string "Diode D1 connected to RJ7" was the comment that we created for this variable when we created it in the Visual Page Designer. (It is a good idea to add a meaningful comment for every variable that you create, because this comment will be automatically reproduced in your generated code to remind you of what the variable is to be used for.)
- D1 is an Integer Variable ("Class=Iv") whose Id is "i0", and which can send data either IN to the PC or OUT from the PC.
- This Variable is used by only one Control in your TCPmaker layout: a Pushbutton control ("Pb1 Class=Pb Id=pb1") located on the main page of our layout ("Page: name=Index Class=Pg Id=index ").
When we say that D1 is used by Pushbutton Pb1, we mean that any time Pb1 is pressed or released on the PC browser screen, instructions in file run.xml tell our library run.swf to assign a new value to variable D1, and send that new value to your device.
Page 8
Let's customize the Receive Event Handler for D1. (It's really simple to do.)
We scroll down a bit further in the mtGen.c file until we find the section that holds the Receive Event Handlers for our variables, and we see this:
//*****************************************************************************
//
// (Receive) Event Handlers:
// =======================
// Each of the following routines is an Event Handler for its corresponding
// data transfer variable (declared above).
//
// When a particular data transfer variable is sent from the PC browser
// and has been received by this device, its particular Event Handler
// (below) will be called.
//
// Customize each routine to handle the data item that has just arrived:
// use it as a command to light an LED, turn on a motor, or whatever your
// application requires.
//
// See notes below on how to transmit a data item in the other direction:
// from the device to the PC browser.
//
//*****************************************************************************
// Event handler for variable: D1 - Diode D1 connected to RJ7
void eventD1(void)
{
// Variable has just arrived, so add your code to DO something with it here:
PORTJbits.RJ7 = D1; // Just add this single line, to light up the LED
}
We have shown above, in bold red type, the one single line that we had to add to our eventD1() Receive Event handler, in order to actually turn the correct LED on or off.
(For clarity, we have shown the specific hardware bit for this LED. Since we made sure that file HardwareProfile.h was set up correctly for the PICDEM.net2 board, we could just as easily have used the constant LED7_IO that is #defined for this board in HardwareProfile.h.)
The important point to remember is that, by the time TCPmaker's code has called a Receive Event handler, the new value that was sent from the PC has already been placed in the corresponding variable in the PIC code (D1 in this case). So, in order to light up the LED, all we had to do was just use the value in D1.
Page 9
This example shows what we mean when we say that TCPmaker works by a principle of Direct Transfer of Variables. Here is how the process works:
- In TCPmaker's Visual Page Designer, we create a variable called D1.
- We place a pushbutton Pb1 on our layout.
- We associate variable D1 with pushbutton Pb1.
- When TCPmaker generates code for your device, it declares a variable in your PIC code of the same name, D1. It also creates a Receive Event handler for D1, along with the means to call it at the proper time.
- When you run your device and click on pushbutton Pb1 on your PC browser screen, the state of the pushbutton gets placed in the associated variable D1.
- That new value for associated variable D1 gets sent to your device over the Ethernet.
- The TCPmaker code framework in your device places the new value it received from the PC into the variable D1 in your device, and calls the Receive Event Handler for D1.
- You can add any code you want to this Receive Event Handler for D1, to just use the new value that is now in variable D1.
Page 10
So, receiving a Variable and doing something with its new value can be pretty simple. What about sending the variable in the other direction?
Well, before we can talk about how to send a Variable from the device IN toward the PC, we have to talk about where we can place the code to do that, which brings us to other event handlers in mtGen.c.
In addition to the Receive Events, TCPmaker's code framework also includes special events called mtServer Events. Unlike Receive Events, mtServer Events are not associated with specific variables, but instead have to do with the connection or disconnection of your device itself, and the time of arrival and processing of individual messages from the PC browser.
File mtGen.c contains an event handler routine for each type of mtServer event.
The next few pages describe the various types of mtServer Events.
Click on the image for page view.
Page 11
The code that runs in your embedded Web server device is a bit like one of those jugglers that you may have seen on TV or in a circus: he is juggling maybe 2 oranges, a bowling ball, and maybe a chain saw as well, all at the same time.
Just like your device, that juggler is pretty busy, all the time. He only touches each item for a brief amount of time: just long enough to toss it up in the air again to keep everything moving. If he spends too much time on any one thing, all the other items come crashing down, with painful results.
This process is called Cooperative Multitasking. Your device calls routines in all sorts of servers in the Microchip Stack, and all sorts of event handlers in TCPmaker's code as well. These routines all cooperate by doing just a little work, saving some reminder of where they left off, and exiting with the knowledge that they will be called again soon.
The code you add to any of TCPmaker's event handlers has to work like that juggler: do just the minimum that you have to do, and get out of that event handler fast, so the next task can get done.
In particular, Never write code in an event handler that waits for something to finish: just start the process (whatever it is) and exit the event handler. You can check whether your process has finished the next time you call your event handler.
Page 12
The mtUserInit event
The first mtServer event we will discuss is the mtUserInit() event handler in file mtGen.c (where all the other TCPmaker event handlers are located). This routine is called only once, when your device starts up.
You can add code to this routine to initialize your software, or even your hardware if you wish. (Microchip provides a routine called InitializeBoard() in file MainDemo.c in your project for you to initialize your hardware, but since MainDemo.c is pretty complex looking, you might want to just use mtUserInit() in mtGen.c instead. It's up to you.)
TCPmaker does add some code of its own to mtUserInit() , to initialize all the variables it has declared for you.
Page 13
The mtFastTick event:
The mtFastTick() event handler is called quite often, each time around the main loop in Microchip's file MainDemo.c, each time mtServer() is called,
mtFastTick() is called whether or not your device is currently connected to a PC browser. This occurs at an interval of roughly 10's of microseconds under normal conditions.
This is the ideal place for you to add code to call your own application software, that may have to manage your custom hardware at a regular basis.
Since mtFastTick() is an event handler, the cautions about Cooperative Multitasking apply here, so any code of yours that you either execute inside of this routine or call from the mtFastTick() event handler, should obey the rules:
- do a little work,
- save the current state,
- get out fast, and
- check the current state the next time around to see how to pick up from where you left off.
In our simple PICDEM.net2 project, we do not need to add any code to the mtFastTick() event handler.
Click on the image for page view.
Page 14
The mtConnect event:
The mtConnect() event handler is called whenever the PC browser connects to your device.
You can use this handler to perform initializations that need to happen when connection is first established, like updating / displaying certain variables, or sending the current states of everything, so PC browser display starts out right (i.e., displaying the current states of everything.
In that spirit, here is we customized mtConnect() in our PICDEM.net2 project. The lines shown in red are lines we either added or enabled (by removing comment operators) in the code:
void mtConnect(void)
{
// Example of mtConnect event code --------------
//
// Call user-defined sendLedStates() routine,
// to tell the browser the states of all the LEDs
//
//sendLedStates();
// ********* Add your mtConnect event code here: *********
// OK, let's activate the sendLedStates() function below, and USE it
sendLedStates();
} // mtConnect()
// CHANGED BY HAND: Enable this function
void sendLedStates(void)
{
// Set all the transmit flags
D1TxFlag = 1;
D2TxFlag = 1;
D3TxFlag = 1;
D4TxFlag = 1;
D5TxFlag = 1;
D6TxFlag = 1;
D7TxFlag = 1;
D8TxFlag = 1;
} // sendLedStates()
We added a line to call the setLedStates() function (provided in commented out form in mtGen.c as a reference example), so that whenever a PC browser connects to the device, we arrange to send the current states of all of the LEDs, so the PC browser display is in sync with the real device.
All we had to do to arrange that transfer was to set the corresponding Tx flag for each variable, D1TxFlag ... D8TxFlag, to a non-zero value. mtServer() will sense this the next time around the main loop, will immediately send the values of D1...D8 to the PC, and then reset these Tx flags to 0 again.
Page 15
The mtDisconnect event:
The mtDisconnect() handler is called whenever your device realizes that the PC browser has disconnected from your device.
You might use this to perform some sort of cleanup operations: maybe shut down some part of your hardware or maybe set some flags so your code won't try to send any data if it is not connected.
In our simple PICDEM.net2 project, we don't need to add any code to this mtDisconnect() handler.
Page 16
The mtStartOfMessage event:
The mtStartOfMessage() event handler is called when a message is received from the PC (about 12 times a second), but before this message is decoded.
Variables that may change at modest rates could be sent to the PC from here. (As long as the browser is connected, we should be receiving a message every 80 milliseconds or so: about 12x per second.)
This would also be a good place to do some of your processing work: do a little bit of work during each call to mtStartOfMessage(), using a State Machine.
In our simple PICDEM.net2 project, we don't need to add any code to this mtDisconnect() handler.
Page 17
The mtEndOfMessage event:
The mtEndOfMessage() event handler called when a message is received & AFTER it is decoded.
Variables that may change at modest rates could be sent to the PC from here. (As long as the browser is connected, we should be receiving a message every 80 milliseconds or so: about 12x per second.)
This would also be a good place to do some of your processing work: do a little bit of work during each call to mtEndOfMessage(), using a State Machine.
TCPmaker has helped you by adding commented out code examples, and suggestions in comments, of things you might add to this event handler. We will examine some of these in the next few pages of this tutorial.
Page 18
One of the things that TCPmaker does to help you is to provide commented out examples of code you might use in your project. In the mtEndOfMessage() handler for our PICDEM.net2 project, it provides comments like this:
void mtEndOfMessage(void)
{
// Transmitting Variables to PC browser:
// =====================================
// Here is how to send test values for all Tx variables.
//
// We don't recommend that you enable and run all of these lines at once.
// Rather, we suggest that you send only a few variables at a time, when
// it is meaningful to do so for your specific project. See the commented
// out code samples for one possible way to do things.
//
// Variable D1 - Diode D1 connected to RJ7
//D1 = 0; // Assign a value
//D1TxFlag = 1; // Tell mtServer to send
//
// Variable Pot1 - Pot1 connected to AN2 / RA2
//Pot1 = 0; // Assign a value
//Pot1TxFlag = 1; // Tell mtServer to send
//
... etc for the rest of the variables in your specific project.
These are only examples of what you might do. If you send all of your variables each time mtEndOfMessage() is called, you could send a lot of data and risk flooding your network with messages, so we urge you to act with intelligent restraint. It would be a good idea to only send a particular data Variable from your device when it is meaningful to do so (e.g. when it changes).
We will show presently a specific example of what we added for our PICDEM.net2 project.
Page 19
You may recall that in the previous tutorial, we compiled and ran the code that was generated for this PICDEM.net2 board, without adding any code of our own to do anything with data sent from the PC, or any code to send any data from the device IN to the PC.
When we ran the device, one of the indicator lights on our PC browser layout blinked, as if some ghost was pressing one of the switches on our PICDEM.net2 board, even though we hadn't actually added any code yet to read any of the switches on our board.
How did that happen?
That happened because TCPmaker adds some special "Blink" code to the mtEndOfMessage() handler, to let you know that your device is alive and well. Here is what that code looks like for this specific project:
// - - - - - Start of Initial Testing Code - - - - -
//
// The following Testing Code is generated for the sole purpose of testing
// your generated TCPmaker code. It causes at least one control on the index
// page of your TCPmaker layout, as displayed on the browser, to change
// repeatedly, so you can see that your device is actually communicating
// with the PC browser.
//
// Once you have tested the generated TCPmaker code, you will want
// to remove this Testing Code and replace it with something meaningful
// for your project.
//
// Testing Code: Change something every 0.5 seconds
BlinkCounter--;
if (!BlinkCounter)
{
//
// Toggle Integer Variable Btn1 to cause something to blink
Btn1 ^= 1;
Btn1TxFlag = 1;
// Restore BlinkCounter
BlinkCounter = 6;
}
// - - - - - End of Initial Testing Code - - - - -
In this project, TCPmaker selected Btn1, an Integer Variable that is associated with an Ld (colored LED Indicator Control) on your PC Browser layout, and generated code to change this variable's value (in this case, by toggling between 0 and 1) every 0.5 seconds. This causes the Ld control to blink on the PC browser display.
TCPmaker looks at the Variables and Controls that you have on the default ("index") page of your layout, and chooses one to make a control blink or change. If TCPmaker has to choose a variable that is associated with a gauge, it will cause the gauge reading to increase slowly until it reaches its maximum value, then it will wrap to 0 and begin increasing again.
As the comments state, this "blink" code is only intended for initial testing: we expect that you would disable it or delete it as soon as you start adding your own code to what TCPmaker has generated for you.
Page 20
As we said before, TCPmaker helps you by providing helpful comments containing snippets of code: suggestions of what you might want to add to your project.
Now let's add look at code we will add to the mtEndOfMessage() event handler in our simple PICDEM.net2 project. The lines of code we added are shown in red, and call routines that are supplied by TCPmaker in commented out form in file mtGen.c. We activate these, and show these routines below, also in red.
// Example of mtEndOfMessage event code --------------
//
// Call user defined setLedStates() routine:
// set the LEDs to reflect the variables
// setLedStates();
//
// Call user defined sendPotValue() routine:
// only send the pot once each response
// sendPotValue();
// Call user defined sendPotValue() routine:
// only send the temperature once each response
// sendTemperatureValue();
// ********* Add your custom mtEndOfMessage event code here: *********
// OK, we'll follow the above suggestions
sendPotValue();
sendButtons();
sendTemperatureValue();
} // mtEndOfMessage()
// CHANGED BY HAND: Enable this function
void sendButtons(void)
{
unsigned char myButton;
myButton = !BUTTON0_IO;
if (myButton != Btn0) {
Btn0 = myButton;
Btn0TxFlag = 1;
if (Btn0) {
strcpypgm2ram(It1,"Button 0");
It1TxFlag = 1;
}
}
myButton = !BUTTON1_IO;
if (myButton != Btn1) {
Btn1 = myButton;
Btn1TxFlag = 1;
if (Btn1){
strcpypgm2ram(It1,"Button 1");
It1TxFlag = 1;
}
}
myButton = !BUTTON2_IO;
if (myButton != Btn2) {
Btn2 = myButton;
Btn2TxFlag = 1;
if (Btn2){
strcpypgm2ram(It1,"Button 2");
It1TxFlag = 1;
}
}
myButton = !BUTTON3_IO;
if (myButton != Btn3) {
Btn3 = myButton;
Btn3TxFlag = 1;
if (Btn3){
strcpypgm2ram(It1,"Button 3");
It1TxFlag = 1;
}
}
} // sendButtons()
// CHANGED BY HAND: Enable this function
void sendPotValue(void)
{
// AN2 should already be set up as an analog input
ADCON0 = 0x09; // ADON, Channel 2 (AN2)
ADCON0bits.GO = 1;
// Wait until A/D conversion is done
while(ADCON0bits.GO);
// AD converter errata work around (ex: PIC18F87J10 A2)
#if !defined(__18F87J50) && !defined(_18F87J50)
PRODL = ADCON2;
ADCON2bits.ADCS0 = 1;
ADCON2bits.ADCS1 = 1;
ADCON2 = PRODL;
#endif
//Pot1 = ADRESL & 0xFF;
//Pot1 |= (ADRESH << 8) & 0xF00;
//Pot1 = Pot1 + (ADRESH << 8);
Pot1 = ADRES;
Pot1TxFlag = 1;
} // sendPotValue()
// CHANGED BY HAND: Enable this function
void sendTemperatureValue(void)
{
// AN1 should already be set up as an analog input
ADCON0 = 0x0D; // ADON, Channel 3 (AN3)
ADCON0bits.GO = 1;
// Wait until A/D conversion is done
while(ADCON0bits.GO);
// AD converter errata work around (ex: PIC18F87J10 A2)
#if !defined(__18F87J50) && !defined(_18F87J50)
PRODL = ADCON2;
ADCON2bits.ADCS0 = 1;
ADCON2bits.ADCS1 = 1;
ADCON2 = PRODL;
#endif
//Degrees = ADRESL & 0xFF;
//Degrees |= (ADRESH << 8) & 0xF00;
//Degrees += (ADRESH << 8);
Degrees = ADRES;
// need to convert to degrees here!
DegreesTxFlag = 1;
} // sendTemperatureValue()
Page 21
That's all we have to do to add enough code to make our PICDEN.net2 project send data back and forth between our board and the PC browser. You will find that the amount of work you have to do to make a good looking, highly responsive embedded web server device is exceptionally small, because TCPmaker has done so much for you.
We're also at the end of our Visual Tour of TCPmaker Pro. If you have followed along this far, you have seen how TCPmaker's Visual Page Designer lets you create attractive and quick-responding web content, with screen controls that you can grab onto, click, drag, and display your data. These screen controls are well suited for embedded devices that have to control or monitor hardware.
|