Page 1
We have seen that TCPmaker Pro's Visual Page Designer can easily create attractive layouts with multiple pages of controls and displays. We found that it can be desirable to make your pages consistent with each other: a consistent use of colors, and consistent placement of navigation controls will make your layout look more professional and attractive.
We also saw that TCPmaker has a "Clone Page" capability that can save you a lot of time. You can spend time adding, positioning, and setting properties of controls on one page, getting it just the way you want it. Then when you decide that you want to make another page that is very similar to the first, you can just click the "Clone Page" button to make an exact copy of the first page, with exact copies of all the controls on it. It then becomes a simple matter to make small changes to the clone page, and save yourself a lot of time and effort.
There are limitations to "Clone Page," however. The biggest limitation is that it is a one-time copy operation. If you make multiple clones of your first page, as we did in the previous tutorial, and then discover that you should have made some more changes to the controls first, then you'll just have to make those changes on all the clone pages.
Luckily, TCPmaker Pro's Visual Page Designer provides an even more powerful mechanism to "future proof" your multi-page layouts: the Master Page Template.
Page 2
You may be familiar with using templates or Master page layouts in other PC applications like Microsoft Power Point, Adobe Dreamweaver, or other programs. If so, you should feel right at home with TCPmaker's Master Page Template.
If you choose to use a Master Template page with your layout (it's optional, and off by default), here's how it works:
You edit the Master Template page layout just as you would your regular pages, setting the page's background colors, adding Controls and Background Elements, and adjusting positions and properties of these items.
The background colors of the Master Template page can be used on your other pages, so all pages can have the same colors.
The Controls and Background Elements that you place on the Master Template page can be displayed on regular pages, in identical form on each page, in addition to any extra controls you might place on the regular page.
You can choose, for every regular page, whether or not to apply the template page colors to that specific regular page.
You can choose, for every regular page, whether or not to display the template's Controls (and Background Elements) to that specific regular page.
Those last two points are important. You can apply the Master Template to most of your pages, to give them a consistent look. If you want, you can keep a few pages separate from the template, to give them a noticably different look.
You might show those special non-Template pages only under certain unusual conditions: for example, a non-Template page might have a red colored background, to indicate an alarm situation. This non-Template page would be intentionally designed to look so different from the regular pages that it is immediately obvious at a glance, even from across the room, that something is wrong.
Page 3
Let's take a look at a project that uses a Master Template.
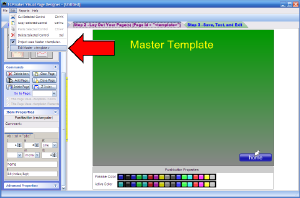
First of all, we need to check the Edit menu item labeled "Project uses Master <template>".
Then, click the Edit menu item labeled "Edit Master <template>", and set up the template page:
- Select background colors
- Add any Controls and Background Elements that you want to appear on multiple pages of your project.
In this example, we have added a Tx control containing a yellow title "Master Template", and have added a blue "Home" button on the lower right corner. We have added a navigation command to the g property of that button, to take us back to the index page from whatever page we are on.
Click on the image for page view.
Page 4
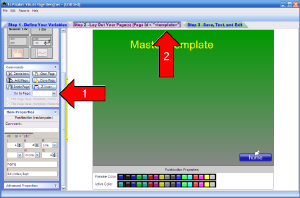
We can tell that we are currently viewing the Master Template in two ways:
- The "Go to Page:" ComboBox (drop down list) is blank.
- The Step 2 tab says [Page id = "<template>"]
To get back to a regular page, we use the "Go to Page:" ComboBox (drop down list) in the normal way.
Click on the image for page view.
Page 5
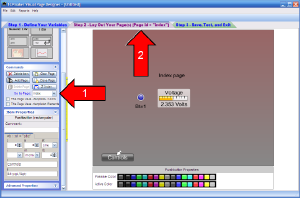
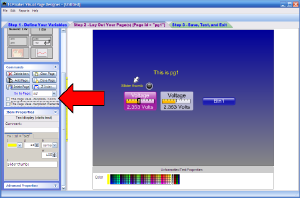
We have just gone to the index page of our project, as we can tell from the same two signs we just mentioned.
Notice that there are two check boxes beneath the "Go to Page:" ComboBox, and that both of them are now enabled but unchecked at the moment.
If "This Page Uses <template> Colors" is checked, then the background colors of the Master Template override the background colors we may have set for this page. We have unchecked this box to show the colors set for this specific page.
If "This Page Uses <template> Elements" is checked, then the Controls and background Elements of the Master Template are added to any Controls and Background Elements that are on the specific page.
We have un-checked both of these checkboxes to show what this page would look like if there were no Master Template for this project.
The next slide shows what this page looks like when we check both of these checkboxes, to fully apply the Master Template to this page.
Click on the image for page view.
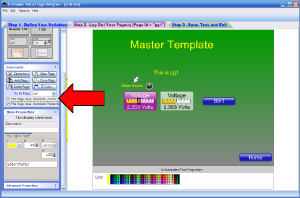
Page 6
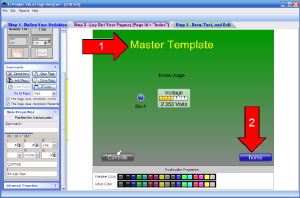
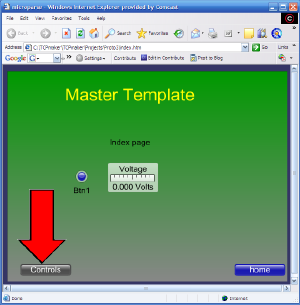
With the Master <template> applied, we see the green background color of the <template>, and we see the yellow title at the top and the blue "Home" button at the lower right corner of the Stage.
The background colors of the <template> have overridden the background colors of the index page, and the Controls of the <template> have been added to the controls that were on the index page already.
Let's look at another page of our design.
Click on the image for page view.
Page 7
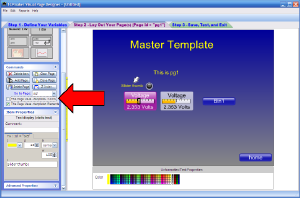
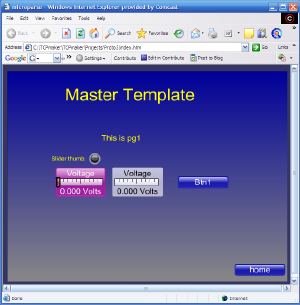
Page pg1 of our design, shown here with both Master <template> checkboxes unchecked, has a blue background and some additional Controls in the middle of the State.
The next page shows what this page looks like with the two Master <template> checkboxes checked, to fully apply the <template>.
Click on the image for page view.
Page 8
This is what page pg1 looks like with the <template> applied.
Once again, the <template> has overridden the background colors, and has added Controls.
Click on the image for page view.
Page 9
If we want, we can only un-check "This Page Uses <template> Colors", to keep the page's original colors, but use the Controls from the Master <template>.
Click on the image for page view.
Page 10
Let's go to the Step 3 page to test our layout with these settings.
As we saw in an earlier tutorial, we need to
- first click the "save" button to save the layout to a file,
- then click the "test" button to actually test our layout in a browser.
The next page shows what we see in the browser.
Click on the image for page view.
Page 11
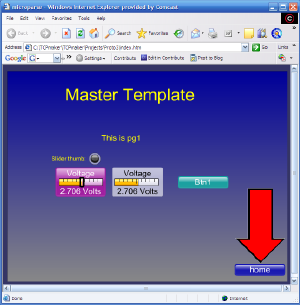
The index page had both of the <template> checkboxes checked, so as to fully apply both the background colors and the Controls of the <template> to this page.
Let's click the Controls button to switch to the other page of our layout.
Click on the image for page view.
Page 12
The page pg1 only had the second <template> checkbox checked, to add the Controls of the <template> to the controls of this page itself. The first checkbox was unchecked, to allow the page's own background colors to be used.
That's what we see here.
Click on the image for page view.
Page 13
This project is set up so that the only Controls that you can change are located on this page, pg1.
These Controls on pg1 are associated with the same Variables whose values are displayed on the index page. The Controls on the index page are not clickable or draggable. They will show the most recent values that were set on page pg1.
We have dragged the thumb of the Horizontal Slider about halfway to the top, and have clicked the Pushbutton labeled Btn1 to toggle it, and light this button to its Active state color.
The next slide shows what the index page looks like, after we click the "home" button.
Click on the image for page view.
Page 14
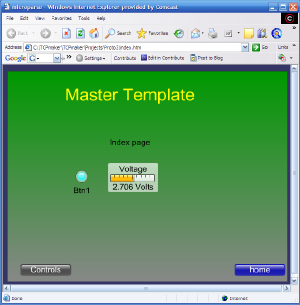
Back on the index page, we see that the changes we made to the controls on page pg1 have had their effect: the Variables they changed are also displayed on
- the Horizontal Gauge, which reads the same "2.706 Volts" that the slider did on pg1, and
- the LED Indicator, which now appear lit.
We can now exit the browser and go back to TCPmaker's Visual Page Designer.
Click on the image for page view.
Page 15
The real power of the Master <template> capability is that you can change it at any time.
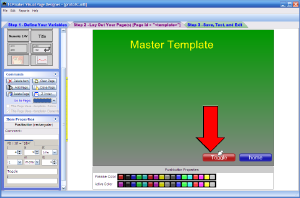
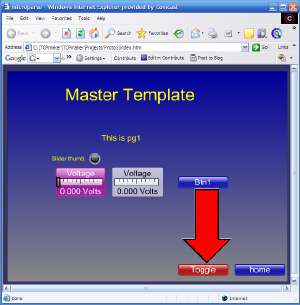
We're back in the Visual Page Designer, and we have just added another button to the Master <template>: a red button labeled "Toggle".
Click on the image for page view.
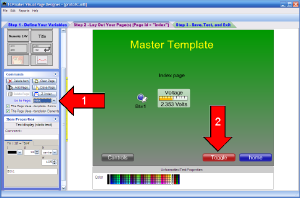
Page 16
When we go to the index page, we see that our new button shows up there.
Click on the image for page view.
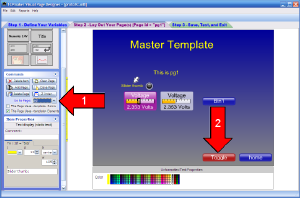
Page 17
When we go to page pg1, we see our new red Toggle button there, too.
Click on the image for page view.
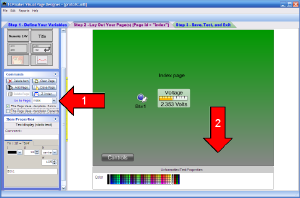
Page 18
Just for fun, let's uncheck "This Page Uses <template> Elements" on the index page this time.
Now we see that our new Toggle button, and in fact all the other Controls from the Master <template>, are now missing from the index page.
Click on the image for page view.
Page 19
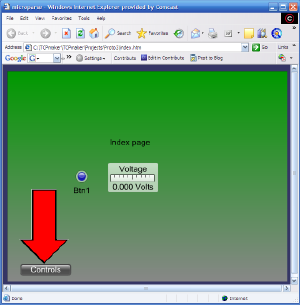
When we save our current layout settings in the browser, we don't see any <template> controls on the index page, but when we click on the Controls button to get to page pg1...
Click on the image for page view.
Page 20
... we see our red Toggle button on pg1 as expected.
Click on the image for page view.
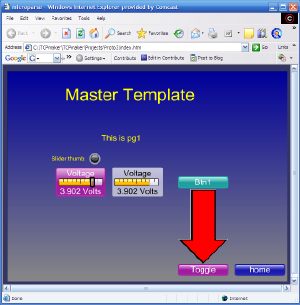
Page 21
Our new Toggle button, that we added to the Master <template>, is just as responsive as we had hoped. When we click it, it toggles to its Active state, displaying its Active color.
Click on the image for page view.
Page 22
We have seen that our Master <template> has a lot of benefits:
- You can use it to give your pages a consistent look.
- Use of the Background colors of the template page can be optionally applied, or not, to each page in your design. That is, you can choose to ignore the template on some pages if you prefer.
- You can place Controls on the <template>, so that these Controls will be added on all pages that use the template.
- Like background colors, you can choose to ignore the <template> Controls on some pages if you want.
- Using a Master <template> can save you time, by letting you set up some Controls one time, and then duplicating these Controls on multiple pages.
- You can change the Master <template> at any time, and your changes will automatically take effect on all pages, without any extra work on your part.
|